
Featured Post

Maintaining Your New California Garden: Life-friendly Fall Pruning

  Mother Nature's Backyard in November: illustrating life-friendly fall pruning. Late fall and early winter are important prun...

Showing posts with label Water Zone gardening; hydrozone; hydro-zone; water-wise gardening. Show all posts

Monday, March 31, 2014

Designing Your New California Garden: 9. Managing Water – Part 2. Irrigation Systems


Last month (February 2014) we considered several topics critical to managing your garden water: setting water goals, Water Zone gardening and capturing/using rainwater.  If you didn’t catch the February post, we suggest that you read it before you continue: http://mother-natures-backyard.blogspot.com/2014/02/designing-your-new-california-garden-9.html.  If you’re new to the ‘Designing Your New California Garden’ series, you might want to start at the beginning (July, 2013; http://mother-natures-backyard.blogspot.com/2013/07/designing-your-new-california-garden-1.html ). The monthly posts and exercises introduce you to the ‘New California Garden’ concept and to our example garden at 112 Willow Street.


Introduction and Background
                                                                    

By this point you’ve probably guessed that the ‘irrigation system’ in the New California Garden is not likely to be a conventional, one size fits all ‘sprinkler system’.  Instead it will be tailored to the Water Zone Plan, site characteristics and the needs of the gardeners themselves.  Part of the trick to designing a functional and enjoyable garden is to look honestly at your own needs and constraints.

Proper watering of native (and other) plants is at least as important as selecting the right plant for a given water zone.   More native plants die in home gardens due to improper watering than almost any other cause.  An irrigation system that allows you to water plants easily and properly is key to a successful garden.  And because your garden will mature – and climate will change – your irrigation system must also be flexible.  

Your ‘irrigation system’ can be anything from a simple spigot and hose to a complex automated irrigation system (or some combination of both).    There’s no one system that’s right for all gardens.  If your landscape plan includes more than one Water Zone – or if your site is anything other than a small flat piece of ground – you may need to use several types of irrigation methods to water everything properly.   Fortunately, you have several options to choose from – and plenty of resources to turn to for advice.

 We summarize the benefits, limitations and best uses for the most common types of irrigation methods used in Southern California at: http://www.slideshare.net/cvadheim/irrigation-methods-for-southern-california-gardens   This table reflects our experience with watering native plants in western Los Angeles County; other experts may present other points of view.  Realize that the relative advantages and disadvantages vary with climate, soil and other factors.  Much of the readily available information on watering native plants – both on-line and in books - is directed to gardeners in central & northern California, or in desert areas.  While generally useful, remember that such information is not specific to our unique climate(s) in western Los Angeles and Orange Counties. 

 
Planning an Irrigation System: Example from 112 Willow St.

It’s easier to plan your own irrigation system once you’ve seen a worked example.  So let’s design a new irrigation system for 112 Willow Street.


The current irrigation system for 112 Willow Street is shown on the site map (above). The ‘system’ may be similar to your own.  It consists of two separate water lines: one line that supplies conventional sprinklers (front and back) and a second supplying 4 hose bibs (spigots).   The sprinklers are controlled by two timers: one for the front yard and one for the back.  The backyard timer has two stations: the northern part of the backyard (nearest the house; station 1) and the rest (station 2). 

As discussed before (February, 2014), the front yard will be left as is for now; the automated sprinkler system will continue to water this area every 10 days for the near future.  However, in considering the irrigation needs of the entire yard, we realize that an additional spigot at the east side of the front yard would greatly facilitate watering the ‘meditation garden’.  We add this to the Irrigation System Map, even though the installation may take place several years in the future.


The backyard sprinkler system won’t need a lot of modification to make it suitable for irrigating the new lawn (see above).  One sprinkler head is superfluous and another would be better if moved slightly.  That and some new, water efficient sprinkler heads with the correct spray radius (8-10 ft.) and we’re in business.    The sprinkler system will likely provide all the water needed for the ‘shady seating’ area as well.  If not, we can supplement occasionally with a hose and sprinkler.  If you need more information on irrigation systems and their design we highly recommend the following tutorials: http://www.irrigationtutorials.com/ .

Planning an irrigation system for the vegetable garden requires deciding how  the space will actually be used.  The gardeners like raised beds, and there’s room for at least two different configurations, each providing 120-130 square feet of growing space (see below).  The gardeners will consider how to arrange the raised beds and will design them next month (April 2014).  Whatever the configuration, they’ll want an irrigation system that’s flexible and as water-wise as possible. 


The gardeners decide to use inexpensive ooze-type soaker hoses, covered with mulch, to water the raised vegetable beds.  This will allow them to water only the planted areas, leaving the pathways dry.  Installing a hose bib for each bed will give the most flexibility. The soaker hoses can be attached directly to the hose bib in each bed. And each bed can be controlled separately, providing the right amount of water for each crop through the growing season.  

During most of the year, the gardeners will control the water manually, as needed. This is, in fact, the most water-efficient method of irrigation.   But what about during the three week summer vacation when the gardeners are routinely away?

Depending on how we design the irrigation system, we can have all the beds on a single, multi-station timer or use individual, battery operated timers for each bed.  In our experience, many smaller yards, particularly if landscaped with water-wise plants, don’t require sophisticated (and costly) irrigation systems with sensors.   Inexpensive hose timers are readily available, easy to use and work well in many situations.  You can even store them away when they aren’t needed to extend their life.   For more advice on timers and sensors see:


The ‘butterfly garden’ area, which is on a 6-9% slope, has presented an irrigation challenge in the past.   The gardeners plan to install primarily water-wise plants – and place the most drought-tolerant of these on the drier top of the slope.  This will go a long way towards making the area less problematic.   But even though the plants will be Water Zone 2 at maturity, the ‘butterfly garden’ will require summer water during the establishment phase (likely the first year or two after planting) and occasionally thereafter. The gardeners will need an irrigation method that is flexible; and once again, they have several options.

One possibility is to use drip irrigation for the first few years.  While some native plant nurseries recommend against drip irrigation, in fact this method can be useful in some circumstances in our part of California.   Drip irrigation has come a long way in the past decade. For a good, thorough tutorial on drip irrigation see  http://www.dripirrigation.com/drip_tutorial.php .  There are many more choices of emitters including micro-sprinklers and soaker-emitters.  These can be used successfully with California native plants under certain conditions.  In our experience, drip irrigation is best used to get plants started or for container plants.   

There are several downsides to drip irrigation.  Drip systems can be costly, particularly if you pay to have them installed. The emitters can plug – or even pop off – during irrigation, so gardeners should inspect their emitters regularly for proper functioning.  Don’t assume your plants are being watered adequately unless you check your drip system routinely!!  

As the root systems grow, the emitters need to be relocated to provide optimal water to the plants. Remember that the root systems of many native plants expand quickly; failure to move emitters around growing plants is another common mistake made by home gardeners.

In our experience, simple soaker hoses can also be used on small garden slopes, provided that drainage is adequate and watering is done over several days.  The secret is to water the area, using a slow seep rate, until runoff starts.  After a few times you’ll know just how long this takes.  Then water again in the next day or two.  This will provide a good soaking, and can be repeated every other week, or as needed, during the first summer.  The advantages of soaker hoses over drip are several: 1)  lower cost; 2) lower maintenance requirements;  3) more even water coverage (good as plant roots grow out); 4) if covered with mulch they last for years, providing for supplemental water when needed.


Because the top of the slope dries out before the bottom, the gardeners will use several soaker hoses to give them maximal flexibility.  The soaker hoses will be installed once the ‘butterfly garden’ is planted to insure good coverage.  After securing the hoses with landscaping staples (also called ‘landscape fabric pins’ or ‘sod staples’), they will be covered with mulch.  They will be connected to the nearby hose bib (spigot) with a hose when in use.   When not in use they will be completely invisible.

The gardeners could also choose to water the ‘butterfly garden’ with a sprinkler that attaches to a hose.  There are many options available – including ones that are quite attractive.  This option has the advantage of being very flexible; you can just water the dry areas and not worry about areas that don’t need water.   It also provides a good approximation of rain if you need to water during winter/spring dry spells.

But any type of overhead watering, whether with conventional sprinklers or those attached to a hose, has several disadvantages.  First, overhead irrigation is less water efficient: in dry climates like ours, some water will evaporate before reaching the ground and more will evaporate from the mulch without reaching the ground beneath.   The other disadvantage, particularly for summer watering, is that overhead watering increases the chance of fungal diseases.  Wet leaves and warm conditions favor the growth of fungi; and leaf splash can spread fungal spores from one plant to the next.

As currently envisioned, the ‘meditation area’ will not need much irrigation once established and the gardeners plan to use stored rainwater to supply some of the water in the future.   The irrigation system for this area will depend on the landscape design for this area.   The back of the neighbor’s garage abuts this area – an ‘ugly view’.   The arrangement of the seating – and choice of plants – will dictate the irrigation needs for this area.  If the homeowners choose a trellis and vine to mask the ‘ugly view’ they will need to supply irrigation to the vines.  Native honeysuckle vines would do well and require only occasional water once established.  We’ll have to wait to finish the irrigation system for the 'meditation area’.
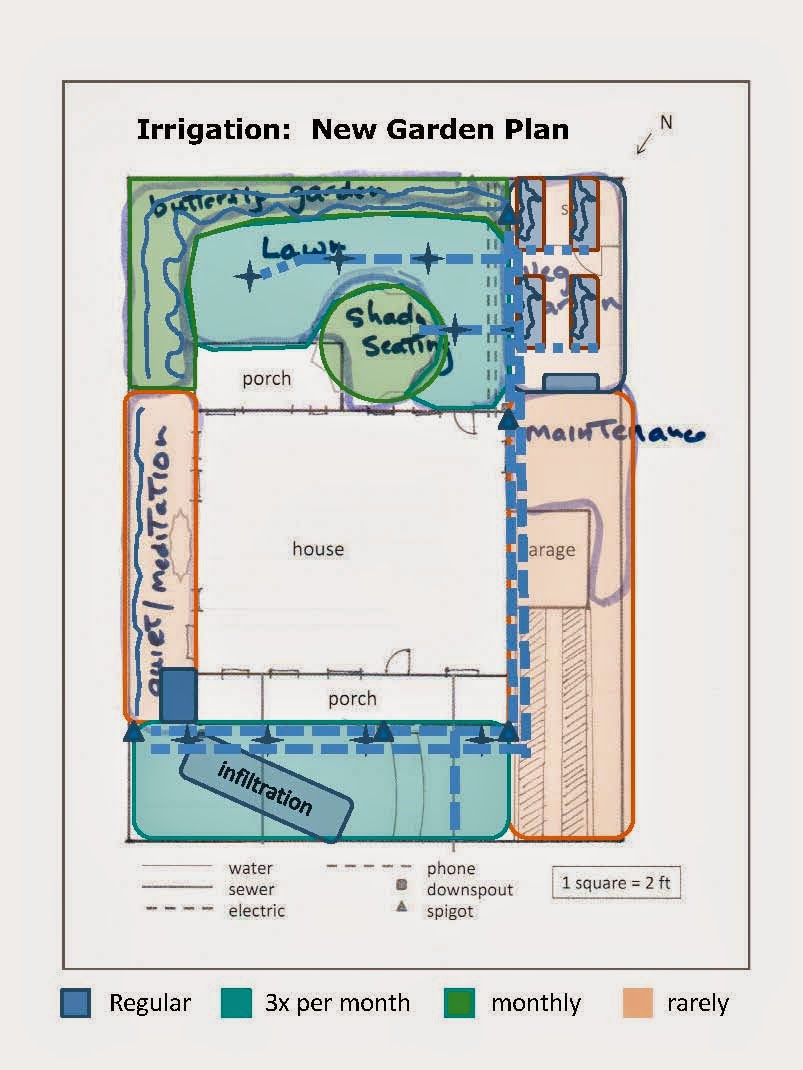


On further review of the ‘near final’ irrigation plan for 112 Willow, the gardeners decide that having a spigot to water the meditation garden will be a necessity as soon as that area is installed.  The idea of watering the area from a backyard spigot doesn’t seem workable.


Designing Your Irrigation Plan


We suggest the following steps in designing your irrigation system:
 
  1. Using a copy of Site Map 2, map your existing irrigation system
  1. Compare your current system with your Water Zone map.
  1. Decide what parts of your current irrigation system are compatible with the Water Zones in your new garden.   You may be surprised; conventional sprinkler systems can sometimes be modified to work.  If parts of the system are no longer needed they can be capped off. And new sprinkler heads can decrease water loss to evaporation.
  1. Consider how you’ll supply water to Water Zones 1 and 2.  Remember that new plants will need to be watered for at least one or two summers until they are established – and Zone 1-2 and 2 plants will need occasional summer water thereafter.    
 
Once you’ve decided on possible irrigation choices we suggest that you step back and evaluate.  In fact, you may want to put your plans aside for a day or two.  Then ask yourself the following questions:
 
·       Are these choices consistent with the amount of time/effort you want to spend watering the landscape?
·       Are they feasible in terms of cost, skills needed to construct, maintenance requirements?
·       Look at your Base Map 2; are you sure you haven’t located irrigation lines where they will interfere with anything critical (like gas & electric lines).   
·       Is the ‘system’ flexible (for example, can you change if the initial method  doesn’t work well; can you use overlapping systems if you need to water one part of a Zone a bit more)?
·       Have you planned enough: spigots?  Sprinkler heads?  controllers?   Are these in convenient locations?   If not, now it the time to do something about it.
 
Once you’re happy with your plan then construct a final Irrigation Plan map.   Be sure to note location of spigots, location of irrigation pipes and sprinkler risers (if any) and the types of heads, and location of drip irrigation lines and soaker hoses (if any).  
 
Additional Internet Resources


We value your comments (below).    You can also contact us directly at mothernaturesbackyard10@gmail.com .


Tuesday, February 18, 2014

Designing Your New California Garden: 9. Managing Water – Part 1. Water Goals, Water Zones (Aqua-Zones) and Harvesting Rain.


This month we start planning your garden in earnest. If you’re just joining the ‘Designing Your New California Garden’ series, we suggest you start at the beginning (July 2013 - http://mother-natures-backyard.blogspot.com/2013/07/designing-your-new-california-garden-1.html) and work forward.  The monthly activities will help you design an attractive, functional, sustainable and water-wise garden.  

Last month we envisioned your new garden: its overall look and the features you want to include.  This month we take the background information and begin to actually design the garden, starting with the water management system.  So take out your Garden Notebook, grab a cup of your favorite beverage and let’s get to work.

 
Introduction

Water-wise gardening is a hot topic right now. Unfortunately, there are many misconceptions on this subject.  You might want to read our posting  (March 2012) : Water-wise Gardening: Do I have to plant cactus or install artificial turf?   http://mother-natures-backyard.blogspot.com/2012/03/water-wise-gardening-do-i-have-to-plant.html

Local gardeners need to seriously reconsider their garden water management.  Climate change will almost certainly mean less water for gardens.   Californians should view the past two drought years as a wake-up call; it’s time to make your garden more water efficient.

The traditional approach to water management was to install a sprinkler system that watered the entire yard.  With increasingly sophisticated technology, many of us divided our gardens into irrigation zones/’stations’ that could be watered separately.  This helped conserve water in many California gardens because it allowed for flexible irrigation schedules. 

The New California Garden approach takes water management to a whole new level.  It starts with defining water goals for your garden.  It asks you to carefully consider how you ‘spend’ your water budget, prioritizing water for the plants most important to your family. And it involves working with the natural conditions in your yard; working ‘with Mother Nature’ rather than against her.   While this may sound difficult, in fact it’s fairly easy.  You will need to do the planning work and adopt a new paradigm for water management.   But once your garden management system is in place, water management becomes easy.
 

Determining your Water Goals

Start by reviewing your Water Goals.    If you haven’t defined them, now is a good time to visit our November, 2013 posting on Assessing Your Family’s Needs (Functional Analysis).   You’ll need to work through the Water Goals exercises before you can design your water management system.  You must understand your starting point – and where you want to end up.   And only you can set your water goals and priorities.

Let’s look again at our example garden at 112 Willow Street.  112 Willow  represents a fairly typical S. California yard.  It has lots of good features, which we explored and mapped in August, 2013.  We’ve conducted a functional analysis of the garden (September, 2013) and mapped functional areas (November, 2013).   Part of the latest mapping exercise involved looking closely at the physical attributes of the site.   You might want to re-read the November posting to prepare for today’s session.


As seen below, we want to decrease overall water usage at 112 Willow Street.  There are areas in the new garden (the vegetable garden; possibly the new ‘lawn area’) that will need regular water. These areas are important to the gardeners so they’ve chosen to ‘spend’ water on them.  But we’ll have to balance them with areas that need less water.


The front yard is landscaped in a low groundcover.  It’s not very exciting and doesn’t attract many birds or butterflies.  But it is evergreen, established and fairly water-wise (it’s only watered once every 10 days, even in summer).  We’ve decided to retain the current front yard landscape, at least for the next few years, and then re-evaluate. 

It’s perfectly fine to re-landscape your garden in segments – and to preserve existing plants that are functional, attractive or important to your family.  However we suggest that you consider the entire yard when designing your Water Management Plan and your hardscape (March 2014).  Irrigation systems, walkways, rain harvesting systems etc. work better if the entire yard is planned as a whole, even though individual parts may be installed over time.  For example, modifications to the backyard irrigation system may require modifications in the front yard.  And traffic flow needs to be considered for the whole outdoor area.

In the Water Goals analysis we’ve identified areas at 112 Willow that tend to stay moist and others that dry out quickly.  We’ve also discovered a few areas that are ‘difficult to irrigate’ due either to physical characteristics of the site (for example, on a slope) or characteristics of the current irrigation system. Now comes the creative part: we’re going to take what we know about the site and use that knowledge to design an integrated water management system for the garden.  The first step is to create a Water Zone Plan, the underlying foundation of a water-efficient garden.

 
Creating a Water Zone (Aqua Zone) Plan

Water Zone gardening is based on grouping plants according to their water needs.  It involves partitioning your garden into Water Zones and choosing plants for each Zone based on their drought tolerance. The Water Zones can range from no/infrequent summer water (Water Zone 1) to regular irrigation (Water Zone 3).  Water Zone gardening is not difficult, but it does require some thought and planning.   If you’re unfamiliar with the Water Zone concept we suggest our posting on the subject (April 2012): http://mother-natures-backyard.blogspot.com/2012/04/water-wise-gardening-tip-save-water.html

The first step in creating a Water-Zone Plan is mapping the existing irrigation conditions.  We’ve created such a map for 112 Willow Street (below).   You can see that most of the backyard receives regular water (Water Zone 3).  It’s all on one sprinkler system – and the watering schedule is based on keeping the sod lawn green.  Much of the current water budget is spent on the backyard.  The side yards only receive monthly hose waterings – just enough to keep the existing plants alive.


If we look closely at the existing Water-Zone map, it’s clear that the backyard will need to be re-Zoned if we want to decrease water use.   Currently, about 75% of the garden is watered at least three times a month; 45% is watered regularly.  Change is obviously needed; but how to proceed?


The key to Water Zone gardening is the placement of water zones. This can be tricky because optimal placement depends on site physical characteristics as well as the uses planned for each area of the garden.  The 112 Willow site includes some physical features that directly impact a water management system.  As seen above, some areas are naturally moist while others dry out more quickly.   Some areas receive more sunlight and wind than others.  In fact, we already considered many of these factors when designing our final functional area map (November, 2013).


One of the easiest ways to approach Water Zone planning is to first map the obvious areas: areas that will need regular water and those that could require none.  We’ve mapped the ‘obvious’ areas for 112 Willow St. above. Mapping these areas can result in sudden flashes of insight.   The vegetable garden will require regular water, so we’ve mapped it as Water Zone 3. On the other extreme, the maintenance area could be ‘paved’ with a permeable hardscape like gravel, crushed rock or pavers (Water Zone 1).   This would be a great solution, providing a solid work surface that requires no water at all.

While considering the ‘maintenance’ area, we realize that we could extend this Water Zone 1 area by removing the existing groundcover around the driveway.  The groundcover is difficult to water in that area – and doesn’t look that great.   We’ll have to consider our choice of hardscape carefully (next month).  But converting the driveway area to permeable hardscape could significantly decrease water use in the front yard and require just a little extra effort and cost.  The driveway area is not a high priority area in terms of usage, so converting it to Zone 1 probably makes sense.

We also decide that the eastern side yard could easily be managed with little water.  We’ll have to choose our plants carefully and perhaps limit the number of plants.  But a few well-chosen plants – with some inspirational hardscape – can turn this area into a shady spot for reading, meditation and other quiet pursuits.  The afternoon shade makes this area a good candidate for Zone 1 or 1-2 (watered deeply several times a summer).


According to our Water Goals (above) we’d like to consider a water-wise grass for the new, smaller lawn area. Our site assessment shows that the lawn will be well-watered most winters;  we’ve located it in a low spot that tends to stay moist. But it will need some summer water.  Let’s assume it will need irrigation 3 times a month in summer; we can revise this based the actual grass we choose.  We map the ‘lawn area’ (Zone 2-3, below) then consider what to do with the ‘shady seating area’ under the apple tree. 


We know from our site physical assessment that very little grows in the shade under the apple tree.  We could use hardscape to create our seating area; we’ve seen nice examples surfaced in gravel or crushed rock.   But we decide to plant at least part with a water-wise native ground cover (Water Zone 2).  This will work well for our apple tree, which is established and requires only occasional water.   The area will likely also receive some water when the ‘lawn area’ is irrigated.

The new ‘butterfly garden’ presents some water management challenges.  The area slopes down to the new lawn.  It’s difficult to water and the top of the slope (south side) dries out in warm weather; it would be helpful to water this area less frequently.   But the area also provides views from the house and patio, so it needs to look nice, particularly in spring/summer.  We’ll need to satisfy both requirements with our Water Zone plan.

We’ve located the butterfly garden wisely, in this sunny part of the garden.  We’ll want to use plants native to S. California to attract the local butterflies.  Fortunately, many native ‘butterfly plants’ are quite drought tolerant once established.  If we choose carefully, we’ll be able to water this area once a month or so in summer.   We decide that the butterfly garden can easily be assigned to Water Zone 2.


Looking at the final Water Zone Plan, we’re impressed by the difference between it and the existing conditions.  Approximately half of the new garden (including front yard) will require water once a month or less – a full 1/3 will need no water at all!  Only the vegetable garden will need regular water.  Since growing vegetables is an important activity, the gardeners are happy to spend more of their water budget on the vegetable garden - and much less on areas that are less important.   We’ve got a workable plan!

In summary, the steps in creating a Water Zone Plan for your new garden are:

  1. Determine your overall water goal – often to decrease water usage; you may want to specify the amount of decrease you desire.

  1. Map out your current water use distribution – to determine where your water budget currently is spent.  Roughly calculate the percentage that requires regular water (you may be surprised!).

  1. Study the maps created for your site physical assessment.  They may suggest areas that are already more moist or dry based on soil conditions, topography, light and wind patterns or other factors. You will use this information to guide the placement of Water Zones.

  1. Review your final Bubble Map. Are the use areas compatible with the physical conditions?   If not, modify the map.

  1. Take a copy of your final Bubble Plan (map of activity/use areas).

    1. Map areas that will require regular water (examples: vegetable garden; roses; some fruit trees; tropical plants; wetland/pondside plants; conventional sod lawn);

    1. Map areas that could require no water at all (examples: unplanted areas like seating areas; areas just covered with mulch, including gravel or other inorganic mulch; areas planted with some highly drought-tolerant California native plants, particularly those native to Southern California; areas utilizing desert plants).

  1. Roughly calculate the area that will require regular water.   Compare it to the percentage in your current garden.  You may find that you’ve already reached your goal for decreased water use.   If not, these calculations will indicate how much of the rest of the garden will need to be Zone 1 or Zone 2. 

  1. Assign Water Zones to the remaining areas of the garden.  This must be based on a realistic assessment of the physical characteristics of the site as well as the functional needs of each area.  Be creative: you may be able to use attractive hardscape (pavers; stones; statuary) and judicious use of plants to create an attractive oasis that requires very little water.  We’ll consider hardscape matters next month.

  1. Create your final Water Zone Map, realizing that you may need to modify the map when you choose your hardscape and plants.


Managing Rainwater/Harvesting Rain

Garden water management should include strategies for managing rain. Rainwater is clean, free water.   Inhabitants of other dry and Mediterranean climates (for example S. Africa, Australia and even parts of the U.S. Southwest) have long made use of every drop of rainwater.   We can learn a lot from them.   Among the techniques they use are: saving rainwater for later use; diverting roof runoff for use in the garden; creating holding basins to allow water to percolate into the ground; using pervious pavement/hardscape and more.    

You may want to include one or more of these strategies in your New California Garden.  We’ve discussed several of them in previous postings.


Topic
Link
Introduction to harvesting rain
Gutters, downspouts & rain chains
Rain gardens & vegetated swales
Dry swales/dry ‘creek beds’
Rain barrels, cisterns & storage
Permeable paths, patios, etc.
 

Hopefully you’re now inspired to include some rain management methods in your own New California Garden.   After reading about harvesting rain, the gardeners at 112 Willow Street added several new ideas for using rainwater to their Water Goals.


As noted on the map below, the house already has gutters front and back.  There’s currently no gutter on the patio – a source of irritation and drenchings during the rainy season.  We decide to add a gutter and downspout that will direct water from the patio roof to deep water the apple tree. 


The back gutter drains to the west.  In fact, the area near the kitchen door is often muddy after a rainstorm because of the downspout location.  Fortunately, the downspout is close to the proposed vegetable garden; the gardeners would like to use this water to irrigate the vegetable garden in winter/spring.  Is this feasible?   First we’ll need to calculate how much water we’d actually harvest from the back roof during a typical storm.  

We discuss how to do the calculations in our posting on rain gardens and vegetated swales (above).  Calculating the amount of runoff is fairly straightforward.   Let’s assume that a good winter storm delivers ¾ inch of rain.  We do the calculations and are surprised that the back drainage will deliver 38 cubic feet (or 284 gallons) of water during a good winter storm.   The front drainage will produce even more: 57 cubic feet or about 426 gallons.   That’s a lot of water!

The gardeners at 112 Willow Street have several options for their back roof drainage.  If they’re concerned about the volume of water, they can split the drainage so part drains to the east and part to the west.   That option requires some work on the existing gutter and installing a new downspout on the east side.  But it will insure that rainstorms don’t overwhelm the vegetable garden and will also supply water to the ‘meditation garden’.

Alternatively, the gardeners may decide to incorporate rainwater storage into the vegetable garden.  For example, three 50-gallon rain barrels, connected together in series, could store half of the water from a typical storm.  The overflow could be used to deep water the vegetable garden.  A larger storage container (often 300-600 gallon capacity) could store all of the runoff from a typical storm.  The water could then be used during dry periods in winter and spring.

We’ll have to design a creative solution for getting the water from the downspout to the garden area. Water enters most water storage containers from the top; and the bottom of the storage container(s) will need to be above the level of the garden beds to allow for gravity-fed irrigation. So the water will likely have to pass over a walkway into the garden.  Perhaps an entry arch between house and vegetable garden? It could incorporate a downspout extension to convey water from the downspout directly to the storage container(s).   A nice arch would also help to hide the maintenance area from view.


The runoff from the front roof  also requires some thought.  Most of the water currently runs into the street – a waste of 400 gallons with each rainstorm.   Our homeowners might consider building a water infiltration system in their front yard.  For example, a dry swale would make the front yard more interesting while allowing rainwater to percolate into the ground.  The resulting deep watering might extend the irrigation-free period each spring.

The gardeners at 112 Willow might also consider locating a large water storage container near the downspout on the northeast side of the house.  A shrub or trellis could hide the functional-looking storage container from the street.  The water could then be used to irrigate the ‘meditation garden’ in spring and summer. 

The gardeners decide they want the best of both worlds: they will split the water from the NE downspout.  Half will be saved and the other half will infiltrate into the front yard.   This system won’t be implemented right away – funds and time are limited this year.   But it will ultimately form an important part of the water management system for the entire yard.


We’ve come a long way towards designing a water management system.  Next month (March 2014) we’ll explore designing an irrigation system, water features and pulling the water management system together.


We value your comments (below).    You can also contact us directly at mothernaturesbackyard10@gmail.com.