Pages

Monday, December 31, 2012

Getting to Know Your Garden’s Soil: Improving Soil Drainage


Over the past few months we’ve discussed urban soils (September 2012), soil testing (October 2012) and soil amendments (November 2012).  We end the year by considering soil drainage.  Next month we’ll present one final soils topic - the soil as a living, productive ecosystem.

If you’ve done a soil perc test you now know whether your soil drains quickly, slowly or somewhere in between.   Depending on your results, you may decide to  select appropriate plants based on their drainage needs.  Alternatively, you may choose to alter the drainage of parts of your garden. As always, your gardening choices are unique to your own situation. Our goal at Mother Nature’s Backyard is to help you make informed choices.


Image courtesy of http://www.salinitymanagement.org/
Salinity%20Management%20Guide/ds/ds_7.html
 
Soil drainage is determined by pore spaces.  Soil pores are spaces that are filled with either air or water (see picture above).  Most soils have a combination of large and small pore spaces.  Under normal conditions, larger pores are filled with air and smaller pores with water.  This is good because plant roots and most soil organisms need ready access to both air (oxygen) and water.

Being composed of relatively large soil particles, sandy soils have more large and fewer small pores than soils with more silt and clay particles. The abundant large pores fill quickly, allowing sandy soils to take up water more easily than clay soils.  On the flip side, large pores don’t retain water as well, so sandy soils also dry out more quickly.  

Soils that drain quickly present several challenges.  First, they require more frequent watering, particularly during hot, windy weather.  These soils also leach out soil nutrients more quickly.  Nutrient leaching occurs for two reasons: 1) water percolates through sandy soils more quickly, taking with it dissolved minerals and 2) clay, silt and humus (organic) particles attract soil minerals (via a small electro-magnetic charge) and hold them better than do sand particles. 

As a result of leaching, sandy soils may have lower levels of key nutrients like nitrogen, phosphorus and iron.   Growing plants with high nutrient requirements (like many vegetables and citrus trees) in sandy soils requires routine application of fertilizers or compost.   Fortunately, many Southern California native plants have low nutrient needs and are well-suited to sandy or rocky soils, even without fertilization.   For a list of native plants suitable for sandy soils see: http://www.nbs.csudh.edu/biology/projectsound/habitat/documents/Sandy_Soils-3-11.pdf

On the positive side, very well drained soils hardly ever become saturated (water-logged).  Clay and silty soils have fewer large pore spaces (and more small pores), so they take up water more slowly – but retain soil moisture longer.  These soils also have positive and negative characteristics with regards to drainage.

Slowly draining soils require less irrigation and retain nutrients better.  But they have the potential to become water-logged during wet winters or with over-watering.  Water-logged soils deprive roots of oxygen; plants growing on wet soils tend to be shallow rooted.  Prolonged exposure to water-logged soils can be hazardous to plant health and even lead to death.  Plants that need well-drained soils – including many California native plants – are particularly vulnerable.  These plants often do well in clay soils until their first El Niño year, when they suddenly yellow and die.   They’ve literally ‘drowned’ in the water saturated soil.

On the other hand, slowly draining soils are perfect for a wide range of interesting native plants.  These include plants that normally grow around lakes or streams as well as those from our local seasonal (vernal) marshes and vernal pools (see                http://www.nbs.csudh.edu/biology/projectsound/habitat/documents/Clay_Soils-3-11.pdf and http://www.nbs.csudh.edu/biology/projectsound/habitat/documents/Riparian_Palette-3-11.pdf ).  If you have a slow-draining soil, consider yourself lucky!  People with quickly draining soils can only grow such plants in containers


Compacted soils can be a challenge in local gardens.  Compacted soils (see above) often lack sufficient large pores.  This explains several characteristics of compacted soils.  First, they tend to be low in oxygen compared to non-compacted soils.  This usually only becomes a problem during periods of prolonged heavy rains or when compacted soils are over-watered.   Compacted soils also tend have slow water uptake, leading to runoff.  If you have badly compacted soils – or have a hardpan layer beneath the topsoil - you may want to try one of the methods suggested below.

Our approach to gardening at Mother Nature’s Backyard emphasizes respecting the forces of nature and working with existing conditions.  We’ve come to that philosophy in part for scientific reasons;  we believe it’s important to conserve and restore natural landscapes for their beauty, habitat value and sense of place.   But we’re also pragmatic.  It’s often easier to work with what you have – by choosing appropriate plants and watering methods – than to change your soil dramatically.  That being said, there are a few, relatively simple things you can do that will allow you to grow plants that normally require soils that have faster (or slower) drainage than your garden’s soil.
 

Garden in Raised Beds, Containers & Planters

One of the easiest ways to provide soil with specific characteristics is to garden in raised beds, containers and planters.  These contained environments allow you to create exactly the right soil mix.  You can create soils with better drainage if you want to grow cacti or plants that require sandy or rocky soils. You can provide slowly draining soils for marsh or bog plants.  Or you can create a light, well-drained mix with high organic and nutrient content for growing garden vegetables.  

Container gardening is fun and can be done in almost any garden.  There are a few tricks to gardening in containers and raised beds.  Fortunately, there are many good books and internet resources to get you started.


Create Micro-berms to Increase Soil Drainage

 Another trick for creating faster drainage is to use small soil berms.  A berm is simply a mound of earth. In the garden, berms are usually planted.   Berms need not be massive or require heavy earthmoving equipment to create.  You can make them with a little effort and a hand shovel in most soils.    
 
Central berm before planting (view looking south).  Note gentle slope.

Micro-berms are 1-2 feet taller than the surrounding soil and of any size or shape.  In general, rounded curved shapes with gently sloping sides are most attractive. The photo above shows our central berm in Mother Nature’s Backyard.  It’s about 20 feet across and gently curved in shape.  The central berm is about 2 ½ feet taller than the rest of the garden at its highest point and slopes gently down to the north and east.  We grow local Salvias (Sages), California Sagebrush, native Buckwheats and Penstemons on our central berm.  These plants like good drainage and we have clay-loam soil with moderate drainage.   We provide better drainage with our central berm.   The plants that need the best drainage are planted at the top.
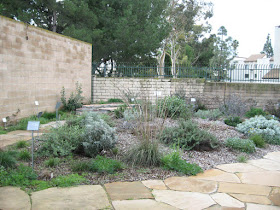
 
Central berm as it looks today - view looking west
 

Micro-berms needn’t be large.  Below is a photo of our small ‘Salvia Berm’ which looks more like a pitcher’s mound than a large berm.  Our ‘Salvia berm’ is only about 1 ft. tall and perhaps 6 feet across. When the plants mature you won’t even know it’s there.
 

The small 'Salvia Berm' is circled
 

If your soil drains slowly, you may be tempted to create micro-berms using imported topsoil.  Imported soils may improve drainage and often can be delivered (and dumped) in place in your garden.    But you’ll need to insure that the better-draining imported soil doesn’t just sit atop the slower-draining native soil, creating an impermeable layer.

When creating a berm with imported soil, mix some of the imported and native soils and create a mixed-soil layer between the berm and native soil.  Ideally, this layer should be at least 12 inches deep, though even 6 inches will be of benefit.  If you cannot create a mixed layer, at the very least you should break up the top layer of native soil before creating your berm.  Taking these steps – or using soil that is the same or similar to the native soil – will insure that your berm drains properly.
 

Create Small Depressions to Increase Water Retention

You can also increase the water-holding capacity of a soil by creating shallow depressions where water can collect.  This is particularly helpful in well-drained soils.  Such depressions are sometimes called swales,  although  true drainage swales and rain gardens require a little more thought and engineering.  Simple depressions don’t have to be deep – several inches below the rest of the garden will do.  Be sure to gently slope the sides so you don’t create a safety hazard.  Then  grow plants that need a little more water in these depressions.

 
Add Organic Materials (unless the plants need nutrient-poor soils)

Consider adding compost to your vegetable garden or non-native flower beds.  Compost adds nutrients while increasing the soil’s ability to hold water.  Organic particles (humus) create small soil pores and also decrease the leaching of nutrients.   They are a normal part of most mature soils.    Even organic mulches (see July, 2012 posting) contribute organic materials to the soil as they break down.  At least a 1 percent increase in organic matter is required to have an effect on the water- and nutrient-holding capacity of a soil.
 

Drill Holes Through a Hardpan Layer

If you have a clay or hardpan layer, you may want to consider drilling holes through it.   First test your soil to be sure that a hard, compacted or impermeable layer is the cause of your drainage problems (see October 2012 posting on ‘Testing Your Soil’).  This will also indicate the location and depth of the compacted layer.   Use a soil auger to drill a series of holes through the hardpan.  See the following for more: http://ceventura.ucanr.edu/Gardening/Coastal/Landscape_578/Hardpan/ .


Frequently Asked Questions
 
Do I need to change my soil’s drainage properties?   No.  If you have a well-drained soil,  no action is needed.  If your soil drains quickly or slowly, you can select plants appropriate for your sandy or clay soil.   Most local soils support a wide range of native and non-native plants. 
 
Should I rototill or double-dig my garden before planting to improve drainage?    In most cases, the answer is no.  While these methods have long been used for intensive vegetable gardening, they may actually do more harm than good for many local soils.  We’ll discuss this more in our January 2013 posting. These methods also bring up buried weed seeds. 
 

Can I improve drainage with ‘lasagna gardening’?  ‘Lasagna gardening’ involves double-digging then layering cardboard/newspaper strips and green materials that decompose over time.  The method is sometimes recommended for gardens with thin/no topsoil – usually in places with far more precipitation than we get.   The ‘lasagna’ method does not improve drainage in most local soils – in fact it may decrease it.  Like any double-digging method, it also destroys the natural soil layers that build up over time.  We don’t recommend this method.  See https://sharepoint.cahnrs.wsu.edu/blogs/urbanhort/archive/2011/03/30/is-quote-lasagna-gardening-quote-really-worth-the-effort.aspx for more.


Do I need to ‘loosen’ my soil every year?   Once again, the answer is usually no.   Soil around trees, shrubs and other permanent plantings is better off left alone.  Use a layer of mulch if appropriate, but don’t dig to improve drainage.   You may want to loosen the soil in your vegetable garden or garden beds containing non-native flowers that are routinely replaced.    Adding compost will also help to improve drainage in soils that are used intensively.


Additional Resources


Send your garden soils questions to mothernaturesbackyard10@gmail.com  or post a comment below.


Saturday, December 22, 2012

Friday, December 21, 2012

Mother Nature's Backyard: The First Year


Check out how our garden grew and changed in 2012 (our first year) at:  http://www.slideshare.net/cvadheim/mother-natures-backyard-the-first-year      (you don't need to have any special program to view the show).


Friday, December 14, 2012

10 Natural Ways to Attract Birds


Natural places, parks and even some neighborhoods attract a lot of birds this time of year.   Like humans, birds need food, water and a place to sleep.  They also need places to hide and safe havens for raising their young.   Areas that provide these basic needs attract birds – it’s as simple as that!

We are fortunate to live along the Pacific Flyway, a huge ‘bird freeway’ along which birds migrate each year.  Some are just passing through.  Others, like White-crowned Sparrows and Yellow-rumped Warblers, spend the winter in Southern California.   Our natural areas, parks and gardens provide food, water and housing for both types of migratory birds.  

In addition to the migrants, there are birds that live in our area all year long.  You may have noticed resident birds in your garden.  Garden bird watching provides hours of enjoyment for the whole family. It’s inexpensive and doesn’t require travel.  You may even see baby birds learning to sing and fly, right in your own backyard.

Whether you want to attract migrants - or encourage resident birds to nest in your yard – a few simple changes can create better bird habitat.   Even including one or two of these ideas can make a huge difference in your garden.  Make a New Year's resolution to make your garden more bird-friendly.  We think you'll find the added enjoyment is well worth the effort.

Most people think of bird feeders when they want to attract birds.  Bird feeders are a useful way to provide food and attract birds - but they are just the beginning.   Here are ten natural ideas that are guaranteed to attract more birds to your garden.


10 Natural Ways to Attract Birds

1.   Plant a tree or large shrub.   This is probably the single best thing you can do to attract more birds.  The tree can be any variety (except palm trees) and doesn’t need to be large.  A 6 ft. shrub will provide a place for birds to hide, perch, sleep and even raise their young.  Plant a tree that produces fruit or berries and you’ll also attract the fruit-eating birds.  For suggestions of good native trees and large shrubs for our area see: http://www.slideshare.net/cvadheim/hedgesscreens-habitat-311
 

2.   Grow annual wildflowers and let them go to seed.  California native wildflowers provide a riot of color in the spring and summer garden.  They also produce lots of seeds.  Let your annual wildflowers go to seed;  they’ll re-seed the garden and also provide food for seed-eating birds.  See the following for suggestions: http://www.slideshare.net/cvadheim/seeds-habitat-311
 
 
3.   Plant something in the Sunflower or Buckwheat groups.  The native sunflowers and buckwheats (Eriogonums) produce loads of tasty seeds for the birds, food for native pollinators/other insects and lovely color for your garden.  You can even eat the sunflower seeds yourself!  Any of the sunflowers will do, from Encelia to annual sunflowers.  These – and the buckwheats - will attract both the seed-eating and insect-eating birds.   For a list of native buckwheats for local gardens see: http://www.slideshare.net/cvadheim/eriogonum-buckwheats-111
 
4.   Grow at least one tree, shrub or vine that produces berries/fruits.  We have both resident (Scrub Jay; Mockingbird) and migratory fruit-eating birds in Southern California.   Grow a fruit they like, and they’ll flock to your yard.  If you choose a berry/fruit that’s not edible for humans, then you can leave the entire crop to the birds.  For suggestions on good native fruits/berries for birds: http://www.slideshare.net/cvadheim/berries-for-birds311
 
 
5.   Provide a source of water.  All birds need water and it can be difficult to find in many neighborhoods.  Consider adding a birdbath, bird drinker or bubbler fountain to your garden.  Moving water attracts birds and prevents mosquitoes from breeding.  A small pond with a waterfall is another option.  Your water source needn’t be costly or elaborate; you can even build it yourself.
 
6.   Use pesticides sparingly – if at all.  Some of our more interesting birds eat insects – at least part of the time.  Even hummingbirds consume insects & spiders sometimes.   Birds actually provide a  natural way to control garden insects, at no extra cost.   Pesticides often kill all kinds of insects – good and bad – and remove a source of food from our gardens.    Think twice before using them.

7.   Don’t ‘prune up’ all of your shrubs.  It’s tempting to prune your shrubs up to make them look tidy.  But ground-feeding birds need a place to hide from dogs and cats.  Leave the lower branches on at least some shrubs to provide a safe haven for our ground-dwelling birds.

8.   Let leaf litter build up under/behind shrubs.  Fallen leaves are food for ground-dwelling insects.  These helpful critters are also food for many birds.  Leave at least some (hidden) leaf litter for the bird’s sake.
 
9.   Keep cats out (if you can).  Cats are wonderful pets – but they are lethal predators for birds.  Control their visits to your yard if you can.
 
10.         Encourage your neighbors to follow these suggestions.  It takes a village to raise a child; and it takes a neighborhood to provide good bird habitat.  Encourage your neighbors to help turn your neighborhood into an island of critical bird habitat.


More Ways to Enjoy Birds
 
1.   Visit local Nature Preserves/natural areas.  The Gardena Willows Wetland Preserve and Madrona Marsh Preserve, the Ballona saltwater and freshwater marshes and areas managed by the Palos Verdes Peninsula Land Conservancy good local natural areas.  The Santa Monica and San Gabriel Mountains, other wild areas are a bit farther away, but provide good bird viewing opportunities.   Local parks (Ken Malloy Harbor Park is particualrly good) and botanic gardens (try the South Coast Botanic Garden) also provide good places to enjoy birds.

2.   Purchase a pair of binoculars. A 7 x 35 pair is inexpensive and easy to use.  A close focus binocular allows you to also view close-up details of butterflies, insects and plants. 
 
3.   Visit the Los Angeles County Museum of Natural History (http://www.nhm.org/site/research-collections/ornithology)
 
4.   Participate in the Great Backyard Bird Count - http://www.birdsource.org/gbbc/ 
 
5.   Learn more about local birds.  Some good resources are:

 
Books: (purchase or check out from local libraries)
 
·         Herbert Clarke: An Introduction to Southern California Birds

·         David Allen Sibley: Sibley Field Guide to Birds of Western North America

·         Kimball Garrett, Dunn & Small: Birds of Southern California

·         National Geographic Field Guide to  Birds of North America
 

On-line:
 
·         Audubon Society (Palos Verdes/South Bay Chapter) http://www.pvsb-audubon.org/  

·         What Bird - http://www.whatbird.com/  

   Wild Birds Unlimited -  http://www.torrance.wbu.com/


6.   Learn more about providing bird habitat.


Wishing all a Happy - and bird-filled - New Year!
 
 
Send your bird gardening questions to: mothernaturesbackyard10@gmail.com
 

Wednesday, December 5, 2012

Plant of the Month (December) : ‘Ray Hartman’ Ceanothus – Ceanothus arboreus x C. griseus ‘Ray Hartman’


'Ray Hartman' Ceanothus - Mother Nature's Backyard, 2017


It’s been an uncommon year throughout the world in 2012.  The ‘La Niña’ climate pattern, with an unusually dry and windy summer/fall, has local plants confused.  Some are blooming earlier than expected.  Among them is the ‘Ray Hartman’ Ceanothus (see above as it looks in 2017).

The genus Ceanothus contains about 50-60 species.  The evergreen species are primarily from California, while the winter-deciduous Ceanothus americanus is native to the eastern U.S. and Canada.  The genus is included in the Buckthorn family (Rhamnaceae) along with California Coffeeberry and the Redberries.   Ceanothus are often known by their genus name - Ceanothus – although another common name is California Lilac.

Several Ceanothus species are native to western Los Angeles County, including the Catalina/Tree Ceanothus (C. arboreus) from Santa Catalina Island.   The Ceanothus of Los Angeles County are members of the chaparral plant community, normally growing at elevations of 1000 ft or greater in the local foothills.   None are native to lower elevations like the Gardena area.


People fall in love with Ceanothus and want to grow them. That’s not surprising - they are beautiful evergreen shrubs.  But choosing a Ceanothus can be a gardening challenge.  Native plants tend to do best under their natural conditions, including light, soil characteristics, precipitation patterns, etc.  Most Ceanothus – whether from the local foothills or the Central/Northern California Coast – grow in conditions quite different from those in Gardena.   We chose ‘Ray Hartman’ because it’s known to be ‘garden hardy’ in our area.  But we need to remain aware that our conditions are not optimal for Ceanothus.   For example, our clay-loam soil drains more slowly than the rocky soil preferred by most Ceanothus. We’ll have to be careful not to overwater.  
   
‘Ray Hartman’ Ceanothus is interesting in several ways.  First, it’s a hybrid (cross) between two parent species: our local Ceanothus arboreus and the northern California Ceanothus griseus (sometimes also called C. thyriflorus var. griseus).   In scientific notation, a hybrid is denoted as follows: Parent species 1 x Parent species 2.   Whenever you see a scientific name with that format, the plant is a cross between two separate species.  A hybrid can occur naturally – bees are notorious for cross-pollinating – or be created artificially, usually by careful hand pollination. 

‘Ray Hartman’ Ceanothus is also interesting because it’s a named cultivar.  A horticultural cultivar is simply a plant variety that’s been selected specifically for gardens.  Cultivars usually have characteristics that make them particularly suited to gardens – nice size, flower color, drought tolerance, etc.   Like hybrids, cultivars can be naturally occurring (in the wild), selected by nurserypersons from plants growing in a garden or created by careful hand pollination.   Some cultivars are hybrids – others are not.  All cultivars are denoted as follows (with the cultivar name in single quotes):  Genus name   species name  ‘Cultivar name’. 

‘Ray Hartman’ Ceanothus (Ceanothus arboreus x C. griseus  ‘Ray Hartman’) is a hybrid cultivar.  You can tell that immediately by its name.   It was released into the nursery trade by Rancho Santa Ana Botanic Garden in 1948.  It’s one of the older California native cultivars and has a long history of use in S. California gardens.    With a bit of luck – and carefully watering – it will succeed in Mother Nature’s Backyard.


Hybrid plants may exhibit characteristics of both parent species.  ‘Ray Hartman’ Ceanothus inherits its size and form from its Catalina Ceanothus parent.  ‘Ray Hartman’ has a tree-like form and will grow quite quickly (2-4 ft a year to start)  to a final height of 10-15+ feet and about as wide.   Technically, ‘Ray Hartman’  is a large rounded shrub, but its large size and open, upright growth pattern make it a good candidate for pruning up as a small tree.  That’s what we plan to do with our ‘Ray Hartman’ Ceanothus.

When creating a ‘tree’ from a large shrub it’s important to not only choose the right species but also to select a young plant with a good basic structure.  Ceanothus species range in size from low-growing groundcovers to large shrubs.  So, it’s essential to choose the right Ceanothus for the job.   The basic structure, evident even in a young plant, will determine the future shape of a plant.  It’s important to find a plant with the right basic shape, even if it means searching through a number of one-gallon plants at the nursery.  Time spent in selection will be richly rewarded with a nicely-shaped tree or shrub in the future.


'Ray Hartman' Ceanothus pruned up as small tree.
Mother Nature's Backyard - 5 years after planting
 
Like other chaparral shrubs, Ceanothus take several years to become established. It’s best to leave them alone during the first few years, only pruning out diseased, damaged or crossed branches.  We just pruned out a few crossed branches that would have rubbed and caused bark damage this winter.

Start pruning a fast-growing Ceanothus in the second or third summer after planting, after bloom is finished and the weather is dry. If training a slower-growing type, you may want to wait until the 4th or 5th summer.  Start by removing several of the lowest branches.  Trim these off all the way to the main trunk, being careful not to prune into the bark ‘collar’ where the branch connects to the trunk.  When pruning a Ceanothus, never prune a branch greater than 1 inch diameter and never prune out more than ¼ of the branches.    

Over the next several summers continue to select for upright growth by pruning out branches that grow down or out.   Most Ceanothus have pleasing natural shapes;   your goal is to accentuate the natural shape.  After the first few years you’ll mostly be pruning out damaged, diseased or crossed branches.  

Another trick to producing a well-shaped Ceanothus tree or shrub is to tip-prune young branches during periods of active growth.  In nature, deer ‘prune’ the delicate (and tasty) ends of branches in spring/summer.  The plant responds with increased growth of side branches, creating a fuller plant.  Since we’ve no deer in Mother Nature’s Backyard, we’ll have to ‘be the deer’ with our pruners for a while.


Like its C. griseus parent, ‘Ray Hartman’ Ceanothus has shiny rounded leaves that are large for a Ceanothus (up to 1 inch).  Because it’s evergreen with minimal summer water it looks good year-round.   It’s most often used as a small tree or large shrub, but can also be planted as a large hedge/hedgerow or screen plant. Like most Ceanothus, ‘Ray Hartman’ can be grown in full sun to part-shade.

The medium blue flowers grow in rather long (3-5”) spike-like clusters.  While individual flowers are small, there are hundreds of sweet-scented blooms per cluster. In a good year, ‘Ray Hartman’ will literally be covered in blooms (see below).   Like many Ceanothus, ‘Ray Hartman’ may flower both fall-winter and spring (the main bloom season).


‘Ray Hartman’ is among the most garden-tolerant of all Ceanothus cultivars. It adapts to a wide range of soil types from sandy to clay and is a bit more tolerant of summer water than other Ceanothus.  It can take inland summer heat and is very drought tolerant once established (after the first year).  We recommend occasional deep water (or none nearer the coast) once established.  With our clay loam we plan to water ‘Ray Hartman’ deeply once a summer - in August, when summer monsoons often provide water to our local mountains.  

In addition to their other attributes, Ceanothus provide excellent habitat for birds and insects.  All Ceanothus are good for attracting bee and fly pollinators.  Ceanothus species are larval host plants for the beautiful  Ceanothus Silkmoth (Hyalophora euryalus (Boisduval, 1855)) along with manzanita (Arctostaphylos), gooseberry (Ribes), willows (Salix), alder (Alnus), and mountain mahogany (Cercocarpus betuloides).

Ceanothus seed is readily eaten by Mockingbirds, Bushtits and finches.  Larger Ceanothus species also provide important cover and nesting sites for local birds.   Planting a Ceanothus can be an important step to attracting more birds to your garden.  We’ll discuss ‘Ten Natural Ways to Attract Birds’ in our next posting (December, 2012).

 
'Ray Hartman' in Dec. 2012 - 10 months after planting


Our 'Ray Hartman' in December, 2013 (20 months after planting)

'Ray Hartman' in 2015 - 3 years after planting


'Ray Hartman' in 2017 - 5 years after planting
Note that all 5 years were drought years in our garden.

 
'Ray Hartman' in 2018 - 6 years after planting as 1-gallon.


Comment on your experiences with 'Ray Hartman' Ceanothus below.  Send your gardening questions to us at: mothernaturesbackyard10@gmail.com